Taking a screenshot
A picture is worth a thousand words.
In this section:
- Capturing screenshots – how to capture screenshots on different platforms
- Send the screenshots to Datafisher
Capturing screenshots
There are many ways and programs to capture screenshots, here we'll outline a few.
Capturing screenshots on Windows
The easiest is to use the Snipping Tool for capturing screenshots.
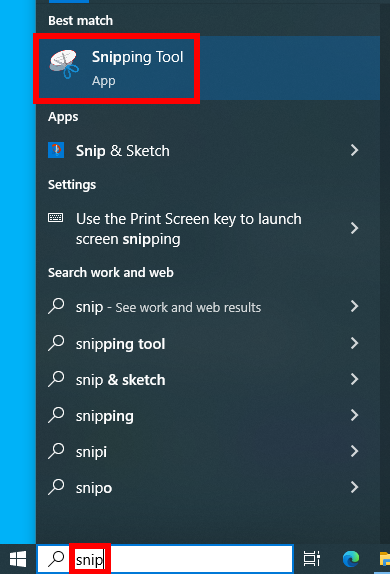
First, write "snip" into the search bar, and select the "Snipping Tool" from the results.

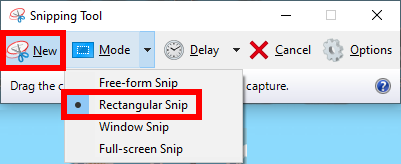
Next, select the "Rectangular Snip" mode. This allows selecting the area on the screen that you want to include in the screenshot.
Then click on the "New" button, and select the area you want to capture. Please also include the browser's address bar in the screenshot.

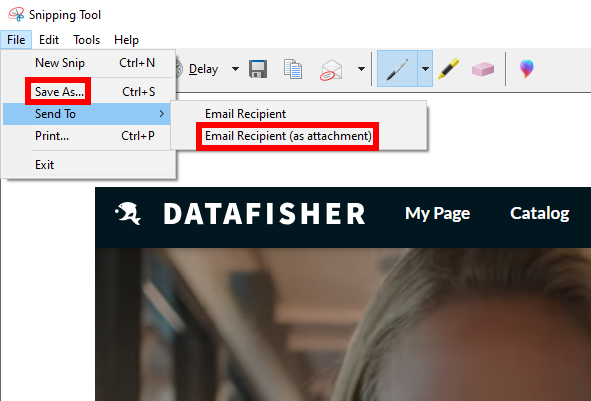
Next, save the image into your computer by selecting "File" → "Save As..." or send it to your email program by selecting "File" → "Send to" → "Email Recipient".

Capturing screenshots on Mac
First, press and hold these three keys together: Shift, Command, and 4.
Next, select the area that you want to capture.
By default, the screenshot is automatically saved to your desktop.
Capturing screenshots on Linux
First, make sure to have the browser window focused.
Next, press the ALT + Print Screen (PrtScr) buttons on your keyboard.
The screenshot tool of your desktop environment should open and ask you where to save the image.
Nimbus Capture
Nimbus Capture is a browser extension that allows saving screenshots and recording videos.
It is available for:
Send the screenshots to Datafisher
Finally, send the screenshots as attachments to support@datafisher.com along with a description of your issue.