Assignment/filtering
The assignment/filtering interface is used to search users and define target groups across the LMS, for example in content assignment, defining user groups, and messaging workflow target groups.
In this section
- Filter by rule (assignment filters) – filter users by rule, e.g. having country=Finland.
- Simple interface (simple mode)
- Advanced interface (advanced mode)
- Filtering results - review the filtered users
- Manual filtering/assignment – manually specify the target group
- Manually filtered/assigned - review the manually specified target group
Filter by rule (assignment filters)
Each user has certain common attributes like:
- name
- email address
- employee ID
- language
and may have many company-specific ones such as:
- country
- company name
- business unit
- division
- job title
- etc.
Most of them can be used when building rules to filter users.
For example, one could assign a content to all users in Finland.
There are two interfaces for building the filter rules: the simple interface, and the advanced interface.
The filter results are visible under Filtering results right after you filter and select the relevant values. To save the filters, you need to click on the "Save" button.
To save the applied filters in the advanced/simple interfaces, you need to click on the "Save" button.
Simple interface
This simple interface provides a simple or-and style filtering.
Use the dropdown fields to filter and select the relevant values.
For example: click on dropdown "country" and choose "Finland" - then the target group will contain only users from Finland.
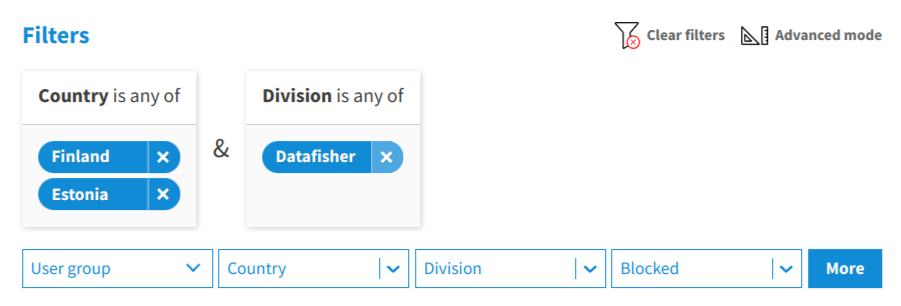
Multiple filters can be selected, for example, by clicking on dropdown "country" and choosing "Finland" and "Estonia", then clicking on dropdown "division" and choosing "Datafisher", the target group will contain users from Finland and Estonia that are in division Datafisher. (see screenshot below)

Click on the "More" button to see all the filter fields that you can use.
You can add as many filters as you want, and remove them either one by one, by clicking on the x icon next to each value, or remove all the filters (your selections) at once by clicking on clear filters in the right upper corner.
Advanced interface
The advanced interface provides additional advanced filtering options.
To use the advanced interface, click on "Advanced mode" in the right upper corner.
In this section:
- Conditions - learn how to use the AND, OR, NOT(AND), NOT(OR), and NOT conditions of the advanced mode.
- Actions - learn how to use the advanced mode actions
- Additional examples - additional examples of using the advance mode
Conditions
In the advanced mode, you can apply the following conditions on the selected dropdown filters:
- AND:

AND will filter the target group to be only users who meet each one of the conditions. (e.g. users that have both "Collar: blue" and "Country: Finland" and "Division: Datafisher". All three conditions must be true in order for a user to be included in this target group.)
- OR:

OR will filter the target group to be only users who meet at least one of the conditions. (e.g. users that have "Collar: blue" or "Country: Finland" or "Division: Datafisher". At least one of those three conditions must be true in order for a user to be included in this target group.)
- NOT(AND):
Condition-7d16e0051ec739d131c479992db840e0.jpeg)
NOT(AND) will filter the target group to be only users who meet each one of the conditions. (e.g. users that are not with "Collar: blue" and are not in "Country: Finland" and are not in "Division: Datafisher". All three conditions must be true in order for a user to be included in this target group.)
- NOT(OR):
Condition-f9bc1a17f3895912dcb5b6a61a593c1e.jpeg)
NOT(OR) will filter the target group to be only users who meet at least one of the conditions. (e.g. users that are not with "Collar: blue" or are not in "Country: Finland" or are not in "Division: Datafisher". At least one of those three conditions must be true in order for a user to be included in this target group.)
- NOT:

NOT will filter the target group to be only users that are not in the selected filter. (e.g. users that are not in "Country: Finland". This condition must be true in order for a user to be included in this target group.)
Actions
- Simple mode - click on "Simple mode" in the right upper corner you will return to the simple interface.
- Drag here to delete - click on "Drag here to delete" to remove advanced filters one by one, by dragging them into the box.
- Clean & Optimize - click on "Clean & Optimize" to visually organize the advanced filters that you chose, and the unnecessary ones (duplicates or will return no values) will be removed.
- Clear filters - click on "Clear filters" to remove all the filters (your selections) at once.
Additional examples
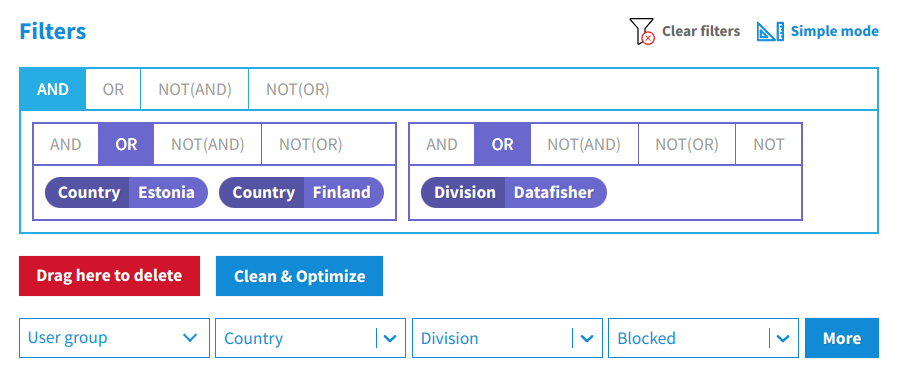
In the screenshot below, the target group will include users from Finland and Estonia that are in division Datafisher division. (can be done in the simple mode)

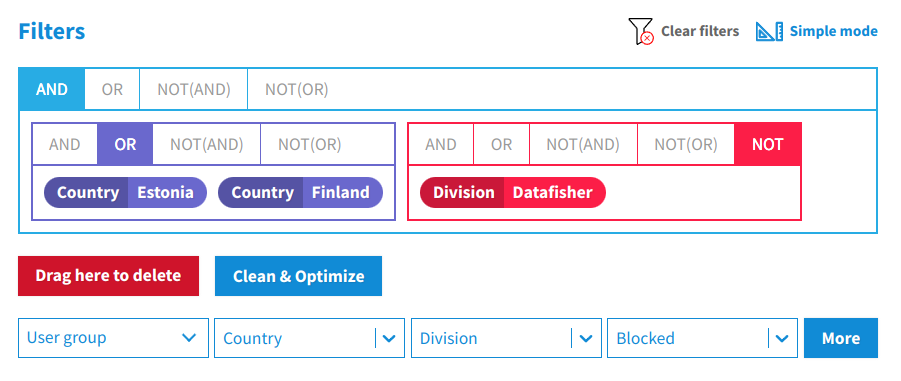
In the screenshot below, the target group will include users from Finland and Estonia that are not in Datafisher division.

Filtering results
Under this tab you can review a list of the users that are matching the applied filter rules. For example, if you selected filter country = Finland, the list will contain only users from Finland.
Manual filtering/assignment
Under this tab you can add users to the target group by searching or pasting the user(s) name, email or employee ID. After adding users, you can review, remove or download them under Manually assigned/filtered.
Manually filtered/assigned
Under this tab you can review or download a list of all the users that you added manually to the target group.
Click on "Clear" to remove the manually assigned users from the target group.